🛠️ Elevate your cabinetry game with precision that speaks volumes!
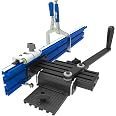
The Kreg PRS1200 Precision Beaded Face-Frame System is a premium manual woodworking tool designed for creating fast, accurate beaded face frames on wood. Featuring carbide beading bits, an adjustable clamp, and a precision router table stop, it enables repeatable, professional-quality cuts. Weighing nearly 12 pounds and made in the USA, this all-in-one system is ideal for custom cabinet makers seeking efficiency and durability.


| Brand | KREG |
| Blade Material | Stainless Steel |
| Surface Recommendation | Wood |
| Power Source | Manual |
| Included Components | '(1) Beaded Face-Frame Fence System', '(1) Precision Router Table Stop', '(1) 1/4' x 1 1/2' (6mm x 38mm) notching bit', '(1) 1/4' (6mm) standard beading bit', '(1) 1/4' (6mm) precision setup bar', '(1) Adjustable workpiece clamp', 'Owner's Manual' |
| Item Weight | 5.44 Kilograms |
| Blade Shape | Round |
| Global Trade Identification Number | 00647096801403 |
| Handle Material | Not identified |
| UPC | 647096801403 |
| Manufacturer | Kreg Tool Inc |
| Part Number | PRS1200 |
| Item Weight | 11.97 pounds |
| Product Dimensions | 31 x 13 x 4 inches |
| Country of Origin | USA |
| Item model number | PRS1200 |
| Is Discontinued By Manufacturer | No |
| Material | Carbide |
| Item Package Quantity | 1 |
| Batteries Included? | No |
| Batteries Required? | No |
A**R
Creates excellent results for a beginner but be careful.
Bottom line, if everything is done properly from the dimensioning your stock through assembly this jig will give you perfect results. I want to share my experience as a novice woodworker attempting to build all of the cabinetry for my kitchen. To avoid seams in between cabinets I have built face frames as wide as 62" with 9 separate door/drawer openings which really puts this system to the test. I used a custom built router table with a t slot centered 6 1/4 inch away and a Woodpecker PRLV2 router lift which I found easy to adjust with the fence installed. Here is my assessment of the system:Pros:-Very accurate, all inaccuracies were due to dimensioning and preparation of the lumber prior to notching.-Easy to use. After a couple cabinets you will know exactly what to do and can really fly.-Others have said 1/4 inch is too small for kitchen cabinets, it's a matter of taste. I think it looks nice.-I had no issues with tear-out using hard maple.-Stop on fence is very reliable.-Instructions and videos were helpful and pretty clear. I did a couple things differently which I will mention below.Cons:-You will probably make some mistakes and waste some pieces you worked hard on preparing. This wont necessarily happen if you are careful and organized, but the risk is definitely a con in relation to applied moulding which is a more low risk mindless method.-The clamp design isn't the greatest. It works perfectly fine, but I found myself frequently re-tensioning as the router vibration worked the nuts loose. You have to be careful about the set up or it will rub on the black metal part which makes for a less fluid movement.-I may have not set up the lever correctly, but I did not have room for two pieces of 3/4" between my fence and the blade. I removed the back bumpers which solved this problem. I'm sure this is bad advice as it does expose the first couple ball bearings, but was a quick solution.Things to be cautious of:-The fence alignment step and notch height step are the keys to this system. Perform these steps right and things will look great. When holding the setup block to your test notch, position yourself directly under a bright light and do not accept even the narrowest crack of light poking between the set up block or any of the three notch surfaces.-As others have mentioned and the manual mentions, your 1.5" material width better be dead on to fit the 1.5" notch. The only way to know is to test until you get it right. Even if I had my table saw fence set I would re-test if I came back to work on a different day.-Also whatever you use to cross cut material to final length whether it be miter saw or crosscut sled needs to be precisely square. More experienced woodworkers will know this already, but just make sure you are checking this as any deviation will present itself as a gap in your final joint.-Make sure that your material is seated firmly on the table when you run it across the notching bit. The clamp can pull it up slightly if you aren't careful about this.- If your joint isn't fitting properly, take your time to determine the cause. Maybe your piece is slightly out of square and you can flip it around and it fits perfect. Maybe you made the mistake above and need to rerun the notch. Maybe the rail was ripped slightly too wide or narrow. The way to figure out is to flip pieces, test on previously cut notches, etc. Just don't assume.- I moved the pieces through very slowly, about 7 seconds for a pass through 3/4". I dont think you always have to worry about this though, I made very fast passes on some test pieces and had no tearout. This obviously depends on the wood you are using.Things I did differently from instructions (not recommending, just worked for me):-I cut the chamfers first. Mostly because I found it a fast and easier way to get started, but also I liked having my rails ready to test fit as soon as the notches were cut.-I did not (usually) sandwich materials. I found the stop to be accurate and reliable enough to run the pieces subsequently. The stop is only deep enough to butt up one piece anyway, so you are relying on tape and/or touch to align the pieces perfectly before sending them through. I found this to be more time consuming and more error prone. I had NO problem with tearout running through single pieces of hard maple, this may change as the bit dulls. The exception was for long pieces with a notch spaced too far for the fence stop to work (<22 inches). These required careful alignment and no reliable method for repeatability, so sandwiching was important.- I created one cabinet end to end just to be able to test the entire system and visualize the final result. After this I ran ALL the notches in ALL cabinets and test fit everything before moving on to beading. Doing it any other way would lead to a ton of time spent realigning the fence and notch height.The last piece of advice I will give is that a nice big assembly surface was so critical for me in testing my progress and final assembly. At risk of sounding like a paid shill for Kreg, I will say that the Kreg KKS2745 45" Clamp Trak Kit, in conjunction with Kreg KKS1030 Klamp Block Set was worth every penny. I built a 4'x4' assembly table with these built in especially for this project and now I cant imagine putting these together without it, though there are obviously other solutions. I only wish I had the space to build it bigger.In summary, I do not think I would be able to duplicate the results I got OR do them as quickly with any other system (outside of some of those commercial solutions), and I scoured the internet for hours reviewing every technique. If you have skill, experience, and success with other techniques then this likely is not worth the price. If you have more time and a tighter budget, I've seen similar processes with shop made jigs on youtube that would be worth trying first. If you are new to this like me and have a good router table, then I think this is the easiest way to get going and worth the price paid.
F**C
high end cabinetry now DIY'able
beaded inset face frame cabinetry has long been considered the most difficult to build because of all the miter joinery required to apply beaded molding to the inside of the face frame. the other option was to rout the bead on to the face frame member and notch out the rail end and the receiving stile. there are various methods to achieve this either by using a an industrial morso machine which costs several thousand dollars, a table saw which is finicky to set up, a hand saw which can be quite slow when you're building multiple cabinets or a router that you have to spend a fair amount of time jigging up to get the correct depth of cut. kreg has come out with an AFFORDABLE and TIME-SAVING alternative to all of these choices and has enabled me to build some great-looking beaded face frames.please note that contrary to what kreg recommends, a 2 hp router will definitely work FINE with this jig as the bit is not massively heavy like a panel raising bit - at least on poplar and pine.there are a few tips i would like to pass on to other would-be cabinetmakers. first, make sure that you're router table is dead flat otherwise you will get tapered cuts when notching the rails and stiles that will result in the frames not being square which will in turn destroy your productivity when it comes time to trim the doors and drawer fronts to fit. if your router table is not flat, shim the router or use adjusting screws so that the router plate clears the edge of your router table to avoid having the wood tilted slightly when you make the cut.after you have everything set up, adjust the notching bit using the metal gauge that's included. notch a scrap piece of wood and check it to make sure that the edges of the metal gauge are flush with the edges of the wood. take another piece of scrap and adjust the fence to the 1/2" LEFT of the 0 mark and notch both ends of the rail piece. test fit this piece and REPEAT this process until you get a nice tight fit - there should be no gaps at the corners or where the rail and stile meet. save these two pieces so you can use them for future alignment. if you just try using the fence you will likely have some minor deviations from reading the gauge (parallax).start making the miter cuts on the rail ends at this point since you already have the set up locked in. first notch the rails that are going to be at the top and bottom of the face frame since they only require one cut on each end. do the face frames one at a time for each cabinet so that you don't accidentally go into auto mode and start routing both ends on each side! i preferred stacking the parts for each cabinet together to avoid confusion. make sure that the cut goes consistently across both pieces which you can align with touch. make sure that the edges are flat with the router plate or you will have alignment issues later on.when you make the notching cut in the stiles, i found that it was not necessary to blue tape the pairs of stiles together and that i prefer being able to align them by touch. examine every cut that you make to ensure that the notch runs across both pieces completely otherwise go back and repeat the cut. marking the router plate as another reviewer recommended would be a great idea if you're not that good at math. try to make all the cuts needed BEFORE you change the fence setting and pay special attention to cabinets that have doors so that you don't accidentally rout out an extra notch like i did when i was running everything through in a large batch! i had some difficulty with getting consistently straight notches across the ends of the stiles but i found that using a file quickly corrected the problem. make sure with each notch that the edges of both pieces are lying flat on the surface of the router plate.i recommend setting up a second router table for routing the beads if you have the money and space to enable you to go back and forth the two processes as needed. this is especially helpful when you make a mistake like i did several times. again, make sure that the router plate is level with the router table surface otherwise you will notice that the bead may start off nice and round but eventually acquire a hard corner like the edge of the original face frame piece and that the beads don't meet up nicely in the corners. keep in mind that if you botch up the beading you can always flip the piece over and try again which is another good reason to save pocket hole drilling for the end prior to assembly.i actually used a porter cable pocket cutter instead of the kreg jig because i've had problems in the past with getting completely flush joints which i believe is due to the slightly steeper drilling angle. test fit the pieces before you pocket screw them together. if you have a problem closing up the joint, the problem is most likely in the miter cuts on the rail ends. use that scrap piece of wood that you cut earlier to re-align the fence and run the cuts again. i noticed that when i was cleaning up the end miter cuts i was able to just hold the piece to the fence manually without having to clamp another piece on top of it.on assembly, i used the metallic portion of an adjustable carpenter's square (the contraption that has a metal ruler that slides through a triangular piece of metal) to make sure the face frame openings were square. lastly, if you are building these cabinets for your own home, don't show your wife pictures of beaded face frames with legs (basically the stiles run all the way to the ground) otherwise you'll end up in my position where you have to pay more attention to where the bead begins and ends since i didn't want the bead running all around the opening at the bottom of the cabinet face frame.
A**.
It works as advertised.
This was a very simple tool to assemble. There is enough videos on you tube along with some very simple directions that came with the tool. One of the reasons I gave it four stars was for the T head bolt that holds the clamp on the fence. I don’t overtighten things and when I was snugging the nut it heard a loud pop. The head on the T T bolt broke off. Most likely a Friday afternoon assembly but for the cost of the unit you would expect things to be stronger than that or at least better quality. I bout a 2.5” hex he’d built that fit in the track to replace the broken bolt.The instructions are for the 1/4” beading setup and that makes sense because that is what is shipped with the system. I bout the 3/8” curler and beading bit because there is now way the 1/4” will look righ5 on kitchen cabinets. I looked all over for the same detailed setup to cut this size similar to way Kreg has for the 1/4” but I could not find any. I called Kreg the next morning and they said they don’t have it either. That is disappointing because Kreg sells the larger bits but the don’t have recommended settings for them. The gentleman that I spoke with said I would just have to run test pieces and figure it out. I was able to do that in about thirty minutes and got the settings I needed. I just was a bit put off that the company that sells the jig and the bits did not have it available. I must admit that afte4 the tool is assembled it operates very smooth and the cuts are clean.I am make no some face frames in the morning and will post some pictures when I have them.
S**1
Game changer
Well made and fool proof
Trustpilot
2 weeks ago
4 days ago